Nachdem ich sämtliche Rollos und Jalousien für die „normalen“ Fenster von Anfang an über meinen Loxone Miniserver Gen 1 steuern konnte, waren unsere Dachfenster-Rollos zunächst ausschließlich über die Velux-eigene Fernsteuerung (KLR 200) bedienbar. In diesem Post beschreibe ich, wie die Steuerung für Rollos und / oder Dachfenster über Home Assistant und damit auch über Loxone umgesetzt werden kann.
„Loxone und Velux Dachfenster / Rollos“ weiterlesenLoxone und SMA-Wechselrichter Update 2026
Wie in Energiemonitoring mit Loxone und SMA erwähnt habe ich zum Abgreifen der Werte aus meinem SMA-Wechselrichter dessen HTTP-Schnittstelle und einen virtuellen Eingang am Miniserver verwendet. Am Morgen des 14. April 2026 saß ich bei schönstem Sonnenschein am Frühstückstisch und wollte in der Loxone App schauen, wieviel Energie die PV-Anlage schon liefert. Zu meinem Erstaunen stand dort „0 Watt“ – schon den ganzen Tag seit Sonnenaufgang. Zuerst dachte ich, die Anlage sei defekt und liefere deshalb keinen Strom. Aber ein Blick in die SMA-App verriet: Die Anlage lieferte Strom, nur die Anzeige in Loxone ging nicht mehr. Da ich unterdessen auch von Lesern mit demselben Problem gehört habe, gehe ich in diesem Beitrag auf die (vermutliche) Ursache und Lösungsmöglichkeiten ein.
„Loxone und SMA-Wechselrichter Update 2026“ weiterlesen
MG4 intelligent laden mit Loxone und Home Assistant
Im Beitrag Energiemanagement mit Loxone – Wallbox habe ich beschrieben, wie ich den Loxone Energiemanager zum intelligenten Laden meines MG4 mittels SMA Wallbox verwende. Während die dort beschriebenen Mechanismen nach wie vor im Einsatz sind, habe ich seitdem zwei wichtige Erweiterungen vorgenommen: Erstens habe ich einen weiteren Lademodus definiert, der die Nutzung selbst erzeugter Energie maximiert, indem optional ein Teil der Energie aus dem Heimspeicher zugeführt wird. Zweitens habe ich eine Komfortfunktion umgesetzt, mit der ich den gewünschten Ziel-Akkustand (State of Charge, SoC) des Autos festlegen kann, bei dem der Ladevorgang automatisch endet. Beide beschreibe ich in diesem Beitrag.
„MG4 intelligent laden mit Loxone und Home Assistant“ weiterlesenLoxone und Nuki Smart Lock Pro
Wir hatten schon länger mit einem Smart Lock geliebäugelt, um nachts automatisch die Haustür abzuschließen. Also haben wir bei der letzten Angebotsaktion ein Nuki Smart Lock Pro (4. Generation) erstanden und in Betrieb genommen. Die Einrichtung sowie die Zeitsteuerung funktionierten hervorragend. Nur ein Problem blieb: Wenn abends automatisch die Tür von innen verschlossen wird, kann sie nicht mehr über den RFID-Chip an der DoorBird-Türsprechanlage entriegelt werden (siehe DoorBird – Installation). Auch die übrigen Arten der Entriegelung wie über HomeKit oder Loxone Touch würden nachts nicht mehr funktionieren, denn alle verwendeten denselben Mechanismus, den Türöffner (Summer) über einen Relais-Ausgang zu aktivieren, und der ist bei abgeschlossener Tür wirkungslos. Es musste also eine Lösung her, um das Nuki Smart Lock über Loxone zu entriegeln.
„Loxone und Nuki Smart Lock Pro“ weiterlesen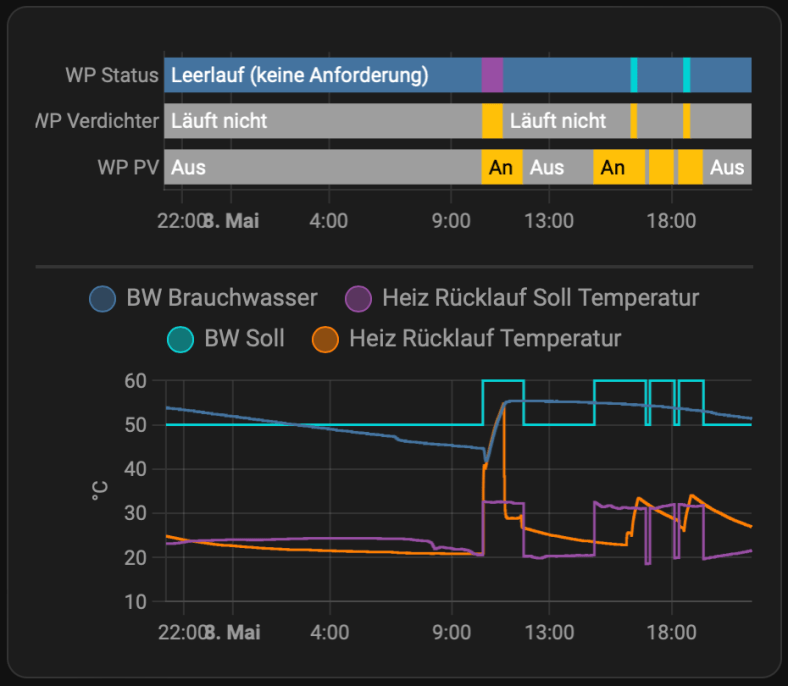
Energiemanagement mit Loxone – Wärmepumpe Update
Wenige Wochen nach Abschluss meiner Miniserie ist schon Zeit für ein Update. In diesem Beitrag beschreibe ich, warum die bisherige Art, den Warmwasserspeicher meiner Wärmepumpe als zusätzlichen Energiespeicher zu nutzen, nicht optimal war, und wofür ich mich stattdessen entschieden habe. Zusammengefasst: Die Komponenten sind dieselben wie vorher, aber das mühevoll verlegte und angeschlossene Kabel hat ausgedient. Dafür ist die neue Lösung deutlich flexibler.
„Energiemanagement mit Loxone – Wärmepumpe Update“ weiterlesen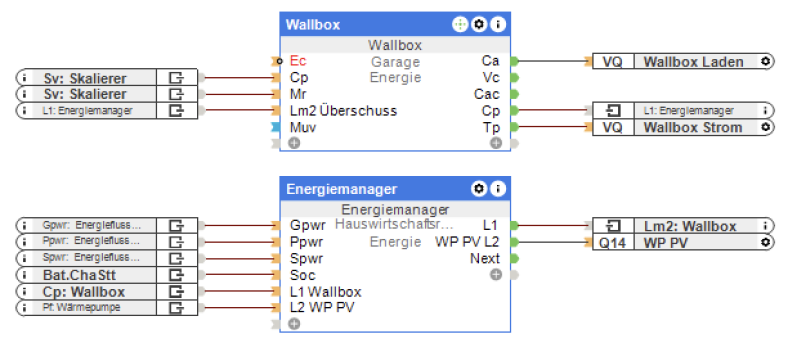
Energiemanagement mit Loxone – Wallbox
Dies ist der fünfte und vorerst letzte Teil meiner Serie zum Thema Photovoltaik, Energiemonitoring und -management. Teil 1 beschreibt die Grundidee und das Auslesen und Anzeigen von Daten aus dem SMA-Wechselrichter. Teil 2 geht auf die Anzeige von Momentanverbrauch sowie Energiezähler der Novelan-Wärmepumpe ein, Teil 3 stellt das Auslesen von Ladeleistung und Energiezähler des SMA EV Chargers vor. Das eigentliche Energiemanagement wird in Teil 4 vorgestellt, inklusive der Integration der PV-Funktion der Wärmepumpe in den Loxone-Energiemanager. Dieser Beitrag komplettiert die Serie, indem das Management der Wallbox ebenfalls über über Loxone umgesetzt wird, inklusive dynamischem Überschussladen.
„Energiemanagement mit Loxone – Wallbox“ weiterlesen
Energiemanagement mit Loxone – Wärmepumpe
Nachdem die ersten drei Teile meiner Serie sich darum drehten, Energieerzeugung und -Verbrauch an einer Stelle transparent und auswertbar zu machen, soll es nun darum gehen, überschüssige PV-Energie möglichst effizient zu nutzen. Ein Teil der Lösung ist ein Batteriespeicher, der direkt vom Wechselrichter ge- und entladen wird. Zusätzlich ist auch das dynamische Steuern von Verbrauchern eine Option den Grad der Eigennutzung von PV-Strom zu erhöhen. Dafür eignen sich insbesondere Wallboxen zum Laden von Elektrofahrzeugen und Heizstäbe für Warmwasserspeicher. Wir erzeugen unser Warmwasser ohnehin elektrisch mit einer Wärmepumpe, die selbst eine Möglichkeit bietet PV-Überschuss zu signalisieren und die Wärmeerzeugung entsprechend anzupassen. In diesem Beitrag beschreibe ich, welche Optionen mir zur Verfügung standen und wofür ich mich letztendlich entschieden habe.
„Energiemanagement mit Loxone – Wärmepumpe“ weiterlesen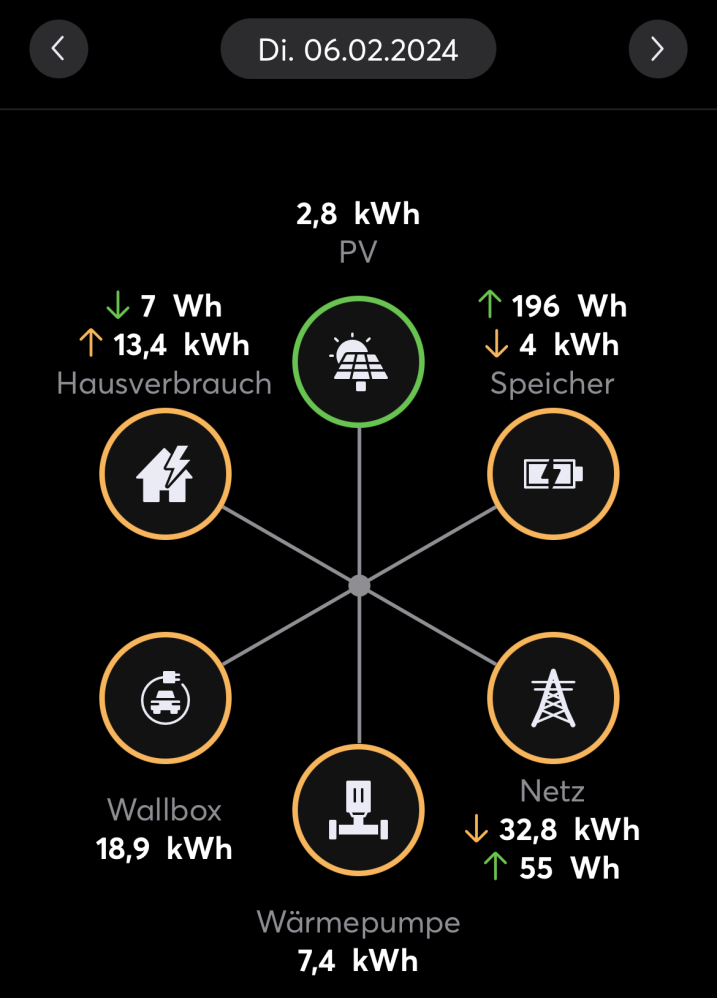
Energiemonitoring mit Loxone – Wallbox
In Teil 3 meiner Serie zum Thema Energiemonitoring mit Loxone stelle ich heute vor, wich ich meine Wallbox, den SMA EV Charger, in mein Loxone-System eingebunden habe. Im ersten Schritt wollte ich vor allem die aktuelle Leistungsaufnahme der Wallbox sowie die Zählerstände auslesen, um den Energiefluss und die Verbrauchswerte zentral darstellen zu können.
TL/DR: Wer eine Lösung für smartes PV-Laden seines Elektrofahrzeugs sucht, die ohne Loxone und Home Assistant einfach funktioniert, sollte sich EVCC anschauen. Wer einfach nur einen SMA EV Charger in Home Assistant integrieren möchte, dem sei die SMA EV Charger integration for Home Assistant empfohlen. Wer außerdem Hintergründe, Codebeispiele oder die fertige Loxone-Integration sehen möchte, darf gerne weiterlesen.
„Energiemonitoring mit Loxone – Wallbox“ weiterlesen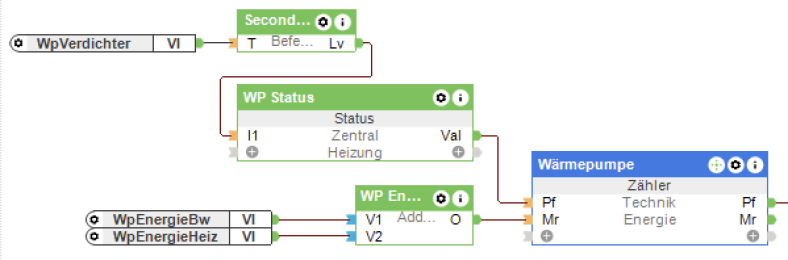
Energiemonitoring mit Loxone – Wärmepumpe
Dies ist der zweite Teil meiner Serie zum Thema Energiemonitoring und -management im Smart Home mit Loxone. Teil 1 „Energiemonitoring mit Loxone und SMA“ beschreibt meine Motivation, meinen Energieverbrauch besser zu verstehen, z.B. um die Photovoltaikanlage bestmöglich zu nutzen, sowie die Schritte um alle Informationen aus der App meiner PV-Anlage in Loxone abzubilden. In diesem Beitrag stelle ich dar, wie ich diese Grundfunktionalität erweitert habe, um den Energieverbrauch unserer Wärmepumpe separat vom Rest der Verbraucher zu erfassen, um diesen getrennt analysieren zu können, und warum meine Lösung auch diesmal ohne Modbus auskommt.
„Energiemonitoring mit Loxone – Wärmepumpe“ weiterlesen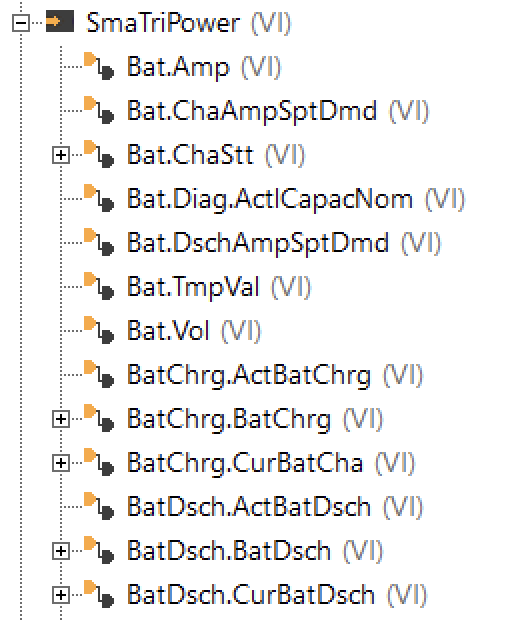
Energiemonitoring mit Loxone und SMA
Wer meinen Blog verfolgt, hat mitbekommen, dass ich im September über das KfW-Förderprogamm 442 geschrieben habe. Es ging um die Beantragung einer Förderung für Photovoltaik-Anlagen. Damit bin ich überhaupt nur in Kontakt gekommen, weil wir selbst eine PV-Anlage installieren lassen wollten. Das war dann im November auch der Fall, und seitdem produzieren wir je nach Witterung eigenen Sonnenstrom. In diesem Artikel beschreibe ich, wie die eigene PV-Anlage einen ganz neuen Blick auf Energieverbrauch und -erzeugung eröffnet, wie man als Nerd mit dieser Motivation umgehen kann, und wie ich seitdem meine Energiebilanz verfolge.
TL/DR: Wer einfach nur wissen möchte, wie man möglichst einfach die Daten aus einem SMA TriPower Smart Wechselrichter mit einem Loxone Miniserver abrufen kann: Per Browser am Wechselrichter einloggen, im Benutzermenü den Smart Inverter Screen aktivieren, damit die Messwerte direkt auf der Starseite sichtbar sind, dann meine Vorlage für den HTTP-Eingang in die Loxone Config importieren und die IP-Adresse anpassen. Zack, feddich: Virtuelle Eingänge!
Update April 2026: Ein Update der „Kommunikations-Komponente“ des Wechselrichters hat offenbar die TLS-Konfiguration so verändert, dass der Miniserver Gen1 keine Verbindung mehr über HTTPS aufbauen kann. Der HTTP-Monitor in der Loxone Config meldet nur noch „SSL Write Error“, und es können keine Werte mehr abgerufen werden. Der direkte Weg ist also (soweit ich weiß) nicht mehr möglich. Details sowie meine Lösung gibt es unter Loxone und SMA-Wechselrichter Update 2026.
„Energiemonitoring mit Loxone und SMA“ weiterlesen